Overview
I have been working as a technical director and developing pipelines, required tools including plug-ins, scripts and stand-alone applications for long time. Languages that I use are C++ with Maya API, C# on windows platforms as well as C++, Nokia’s Qt for cross-platform applications, Python for scripts and PyQt for Python GUI applications. I had been an advanced MEL user until I switched into Python as well.
As a natural result of being a technical director, I have been seeing many different pipelines, approaches, desires, unmeaningful passions towards logics that belong some ages of BC. Being bored due to these closed development perspective of the people and related several issues, I decided to share my pipeline approach with distinguished friends (like you) and industry professionals.
You will see how a pipeline can be designed, maintained in efficient and flexible manner. While we do it we’ll ensure that the pipeline is powerful, dependable and productive enough to handle any kind of production.
I will be explaining everything step by step, so you won’t miss anything, and you will see how much a proper pipeline can benefit the project, the company and the people.
Attack of the Clones
Whenever a rigging/animation pipeline need to be created first and deadliest mistake that people do all the time with unbelievable insist is jumping on the tool set itself rather than paying some attention to big picture which would determine whether the pipeline will be flexible or scalable or even good enough to handle any production the company might have.
Rather than paying attention to all aspect of the pipeline people fire all king of ideas up without planning or thinking their compatibility with each other. As a result after months and years the point the pipeline has reached could be very disappointing, expensive and even most regrettably disasters. Needless to say that inconsistencies are the biggest enemies of any production.
We aren’t going to do these mistakes. Rather we are going to design the development structure and tool structure very carefully, so we won’t bother with nasty surprises later on.
Safak Strikes Back!
Our approach for development is going to be “Design, develop, test and deploy”. So let’s grab a pen and sheets of paper to start for the design stage and take look at some problems we must solve even before they would occur and the feature we would desperately need in our pipeline for our productions.
Problems we might face with;
- Inconsistency due to unorganized development approach.
- Developing and re-developing same things due to inconsistencies. Time-consuming, expensive, meaningless process which solves nothing.
- Ending up having developed same thing many times separately in different tools due to developing and re-developing. Ending up not knowing which tool works on what.
- Having un-scalable pipeline due to poor development and development management. That means your foundation for your pipeline has been created for a plumber.
- Having many unsatisfied users both in artist and technical teams. Very dangerous, people can’t produce work, and they will start to think to find another job, preferable in another continent.
Now let’s take a look the features we must have;
- Careful planning to avoid problems we have stated above.
- Consistency. (Naming convention, the way things work, etc.)
- Scalable approach, providing a solid base, so we can rise on. A strong foundation.
- Providing documentation for the all tools and the APIs.
- Having very happy team who works flawlessly with the pipeline we have developed.
Backbone
We will be building many tools for our pipeline. We will need to develop plug-ins, script and even stand-alone applications. Let’s take a look what we’ll be after considering the age we are living in.
Plug-in: When the time has started with Alias Wavefront Maya, writing a plug-in was only possible in C++ language. With Python implementation, Autodesk Maya has been offering another way to develop plug-ins. Maya’s API classes can be reached via Python scripting language and this allows user to write plug-ins without learning many important aspects of C++ language like memory management.
We are however going to use C++ language for our plug-ins. Since Python still is an interpreted language, we won’t be able to get the same performance that we get from compiled plug-ins that written in C++.
Scripting: Even if we write a plug-in for everything we can’t avoid writing scripts. Creating a rigging/animation pipeline requires many scripts. We will be using scripts to build our GUI in Maya as well (we can develop GUIs in C++ language with Qt libraries though, but we won’t need it for our purposes).
Instead of using function based MEL scripting, we will prefer Python language for our scripting needs because Python offers object orienting programming capabilities. We will take advantage of the language in every aspect of our development and as you can guess inheritance will be one of them.
Stand-alone applications: We will use C++ language with Nokia’s Qt libraries for stand-alone applications. Since Qt libraries are cross-platform we will be able to run them on Microsoft Windows, Mac OS X, and Linux operating systems.
Let the Tool Work
As you already know, scripting is very good for automatizing things like rigging an arm, leg, renaming files or whatever. We are going take this one level up and write codes which write codes for us. This is not an easy task to create such tool environment however benefit that we’ll get from it will surprise you.
Structure
We are going to create a development structure, an approach to the system that we want. This is not the deployment of the tools set rather what and how we create.
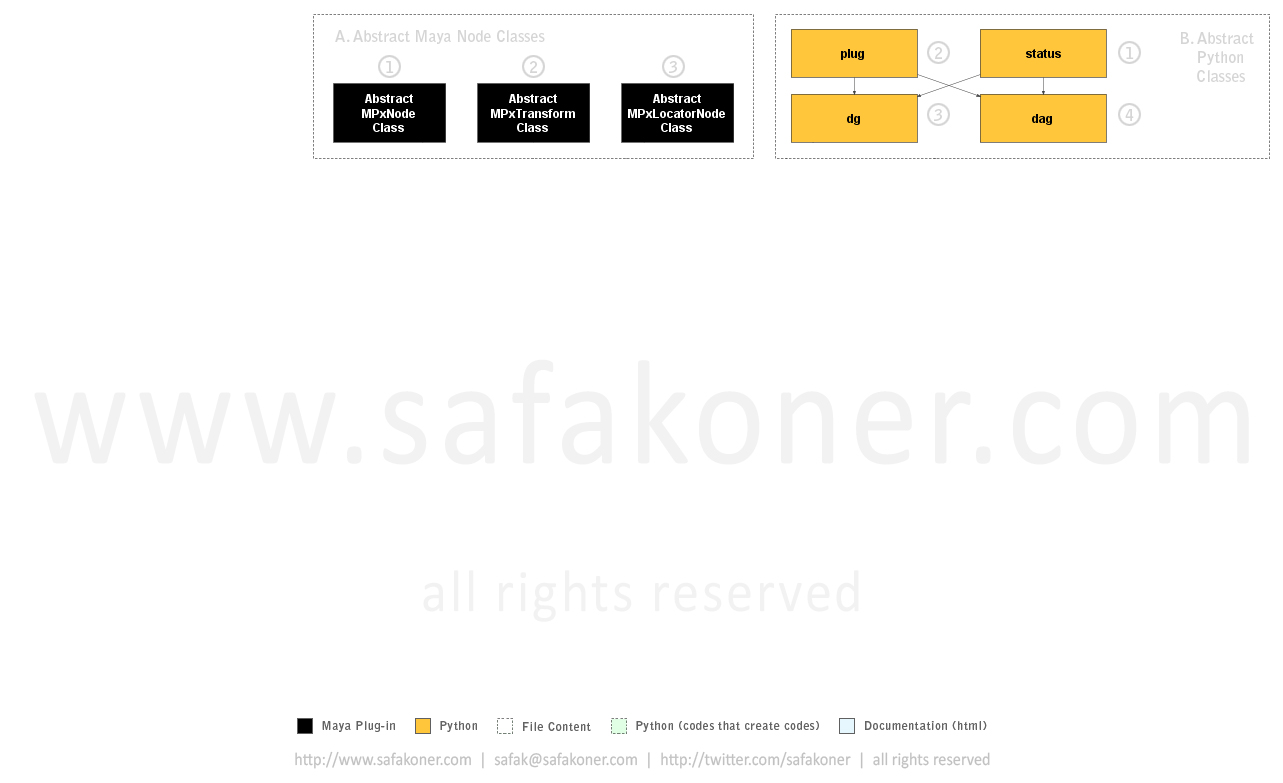
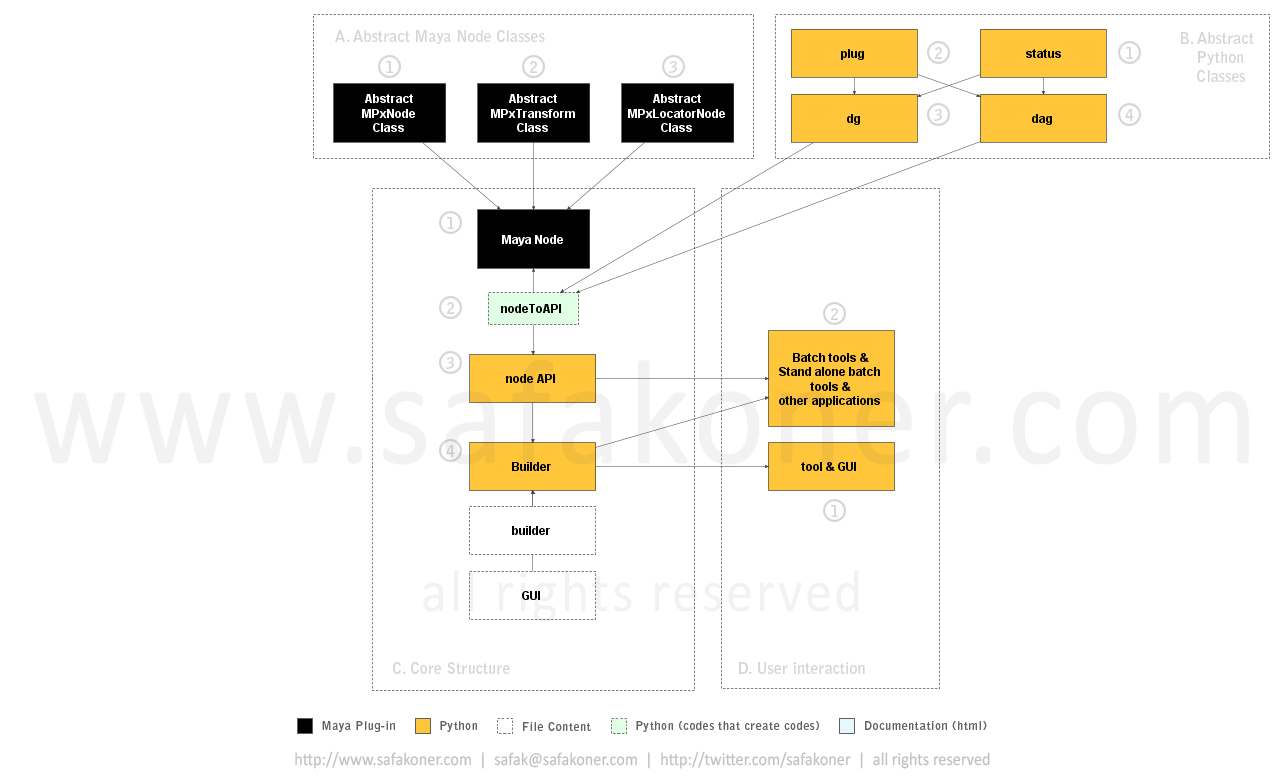
A. Abstract Maya Node Classes
Since we will create many nodes (including MPxNode, MPxTransform and MPxLocatorNode) we better find a way to make them consistent. Nodes in Autodesk Maya are nothing but classes that inherited from related API classes. So we create three classes that we have inherited from MPxNode, MPxTransform and MPxLocatorNode classes. These are abstract classes, which mean we create related pipeline attributes on them. Those attributes are for containing any kind of info we would need in the pipeline. Whenever we need to create a node instead of inheriting it directly from Maya’s API classes we inherit them from related abstract classes so each node will inherit the attributes too. We’ll see how that works soon.
B. Abstract Python Classes
Needless to say when we work on nodes we need to type lots of “createNode”, “setAttr”, “getAttr”, etc. Why not write wrapper classes in Python that would allow us to operate on nodes in Autodesk Maya? Well since Python is an object-oriented scripting language we are able to do so.
Logic behind this idea is creating two abstract node classes for DG and DAG nodes. Those classes will contain mutual methods related with the classes respectively. For instance, on a DAG node you will do many translate, rotate operations or parent and un-parent operations. You will also create DG and DAG nodes, rename them, connect their attributes and delete them. This is where this logic and inheritance come into play. “DG” and “DAG” abstract classes contain those functionalities namely methods. Whenever we develop a new node in C++, we just create a new class for the node, and we inherit that class either from “DG” or “DAG” class depends on its type. MPxNode will be inherited from “DG” and MPxTransform and MPxLocatorNode will be inherited from “DAG” class. So they will have mutual functionalities directly.
Well, of course one thing will be missing. If the new node has new attributes that the abstract class does not have (we are talking about C++ node development at this point) the class you inherited from “DG” or “DAG” (Python wrapper classes) class won’t have those attributes. What we need to do is adding those attributes to the inherited class. That’s why we need another class named “Plug”. Plug class will handle all attribute operations on nodes in Autodesk Maya. Since it’s a class itself, it will come with its functionalities. However, things are getting a bit chore at this point, aren’t they? Creating a new class, adding attributes of the actual node to that class, write many lines of code, not a fancy thing to do. Well, let’s just stop talking about this inheritance right here; we will be seeing the details regarding inheritance in next section and trust me, you will like it.
We have one last class though that we need to take a look before we move further. It’s “Status” class. I personally do prefer to use such class to provide error handling capabilities in the pipeline. Since it’s a class, all error handling operations will be consistent in the pipeline. It’s not a mandatory to use but highly suggested. If you have ever used “MStatus” class in Autodesk Maya’s API, you will have no problem of using it.
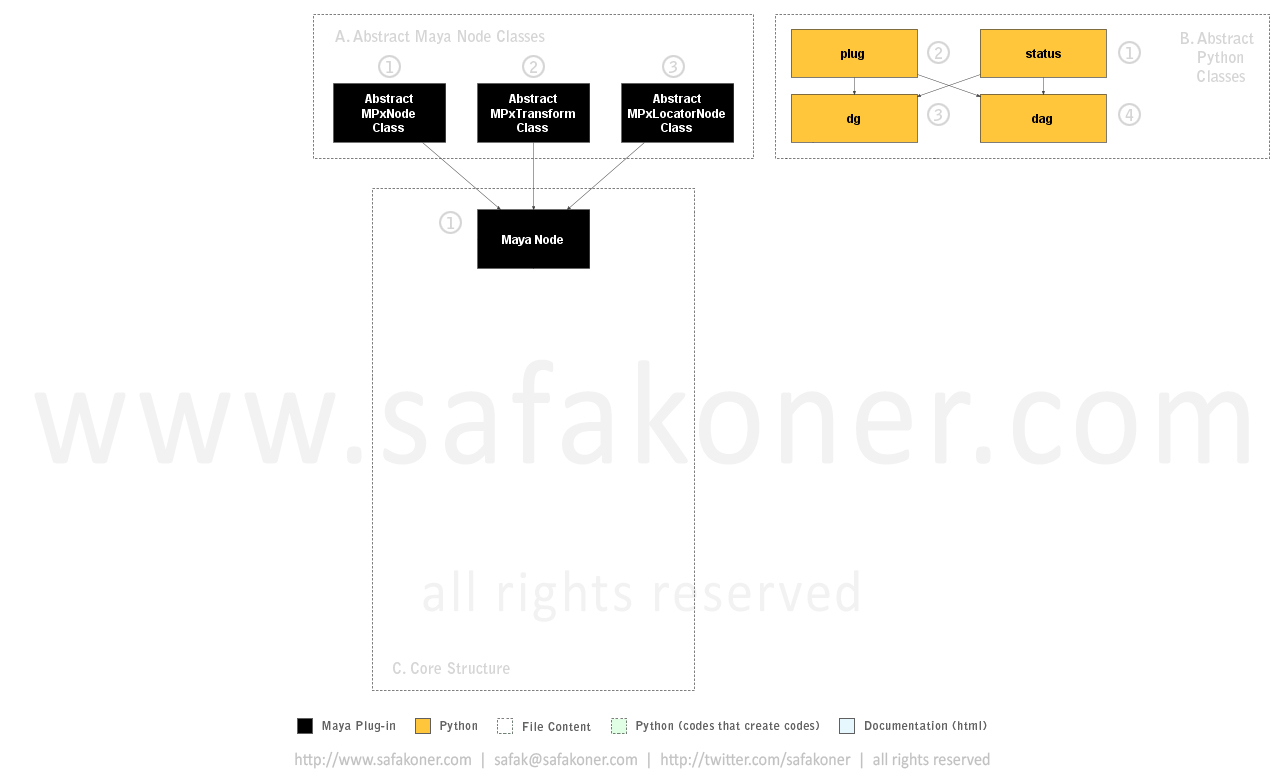
C. Core Structure
As you can see we have created a node (in C++) by inheriting one of the related abstract classed that I mentioned earlier. This node does contain same attributes that abstract class contains.
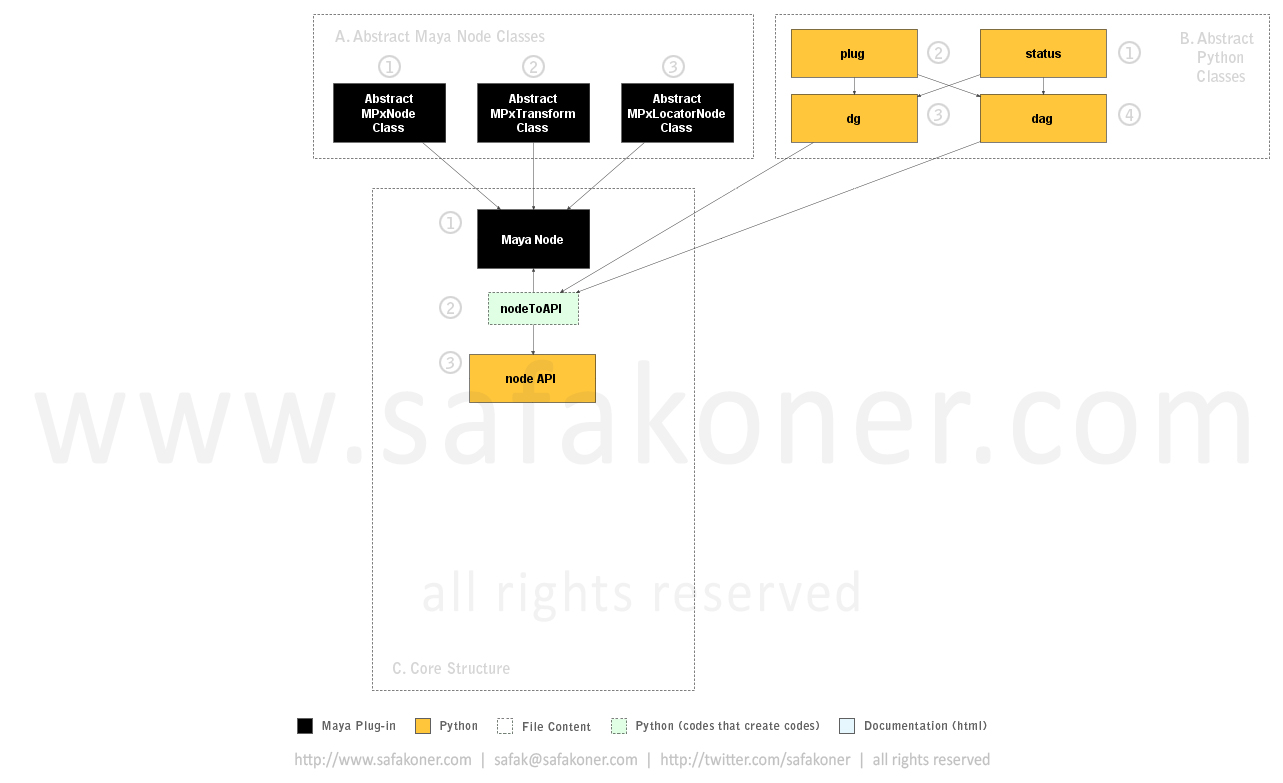
As you can see we have created “node API” Python wrapper class that contains attributes on our node as well as mutual functionalities that inherited from abstract class. So we can import the module and use it like any other python module and class. We’ll see a video about it in following steps.
Since we do not want to create a wrapper class in Python for all nodes that we create in C++ we better find a way to automatize that. This is exactly what “nodeToAPI” python class does though. Basically you select the node in Autodesk Maya, and you run the “doSelection” method, and it writes the wrapper class along with node’s attributes that inherited from “Plug” class. Naturally “nodeToAPI” inherits either “DG” or “DAG” class based on the selected node type and, voila! You have the wrapper class created and ready to use. I have written the “nodeToAPI” class just like other codes that write codes. But it worths, doesn't it?
In previous step we have created the wrapper class for the node. Fancy work.
Say the node was tension node which calculates the tension on the mesh. We can operate on the tension node in object-oriented way, like;
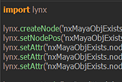
import tension
reload(tension)
node = tension.Tension(‘nameOfTheNode’)
node.inMesh.connectIn(‘pCube1.outMesh’)
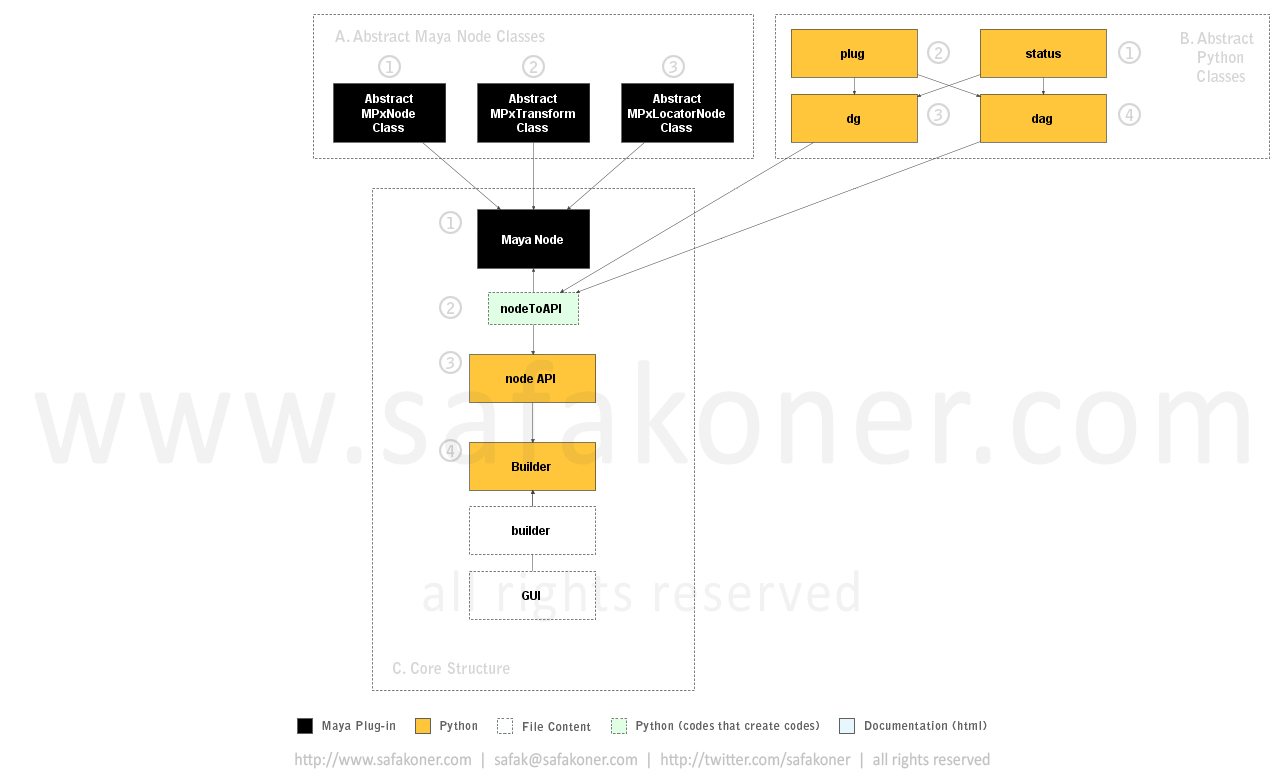
However, we like to provide more than this, like a builder. You do not even use wrapper class to rig something. Say a muscle rig builder that uses this class to operate. “Builder” context of the “Builder” Python file does exactly this.
“GUI” class that accommodated by “Builder” Python file, allows us to call the PyQt GUI widget and parent it anywhere we wish. So we can use the available GUI for the builder if necessary.
By instancing those GUI widgets we can create a rigging window if required without writing additional code.
D. User Interaction
We can have tool sets and their GUIs if they are required. “tool & GUI” works with both “builder” and “GUI” content of the Python files so user can interact with the GUI while builder is doing the work in the background.
Various batch tool can and will be used for many purposes. Since those tools won’t need GUIs, they will be just using the “builder” content of the Python files.
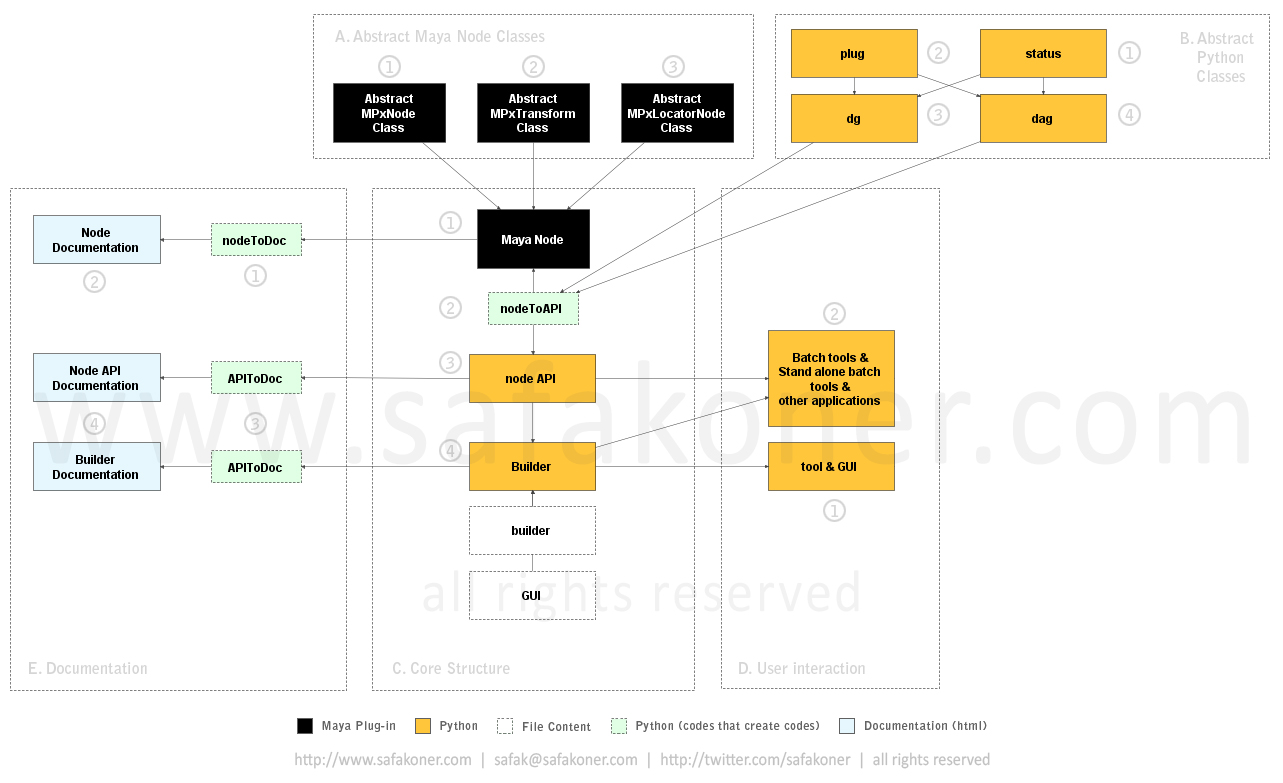
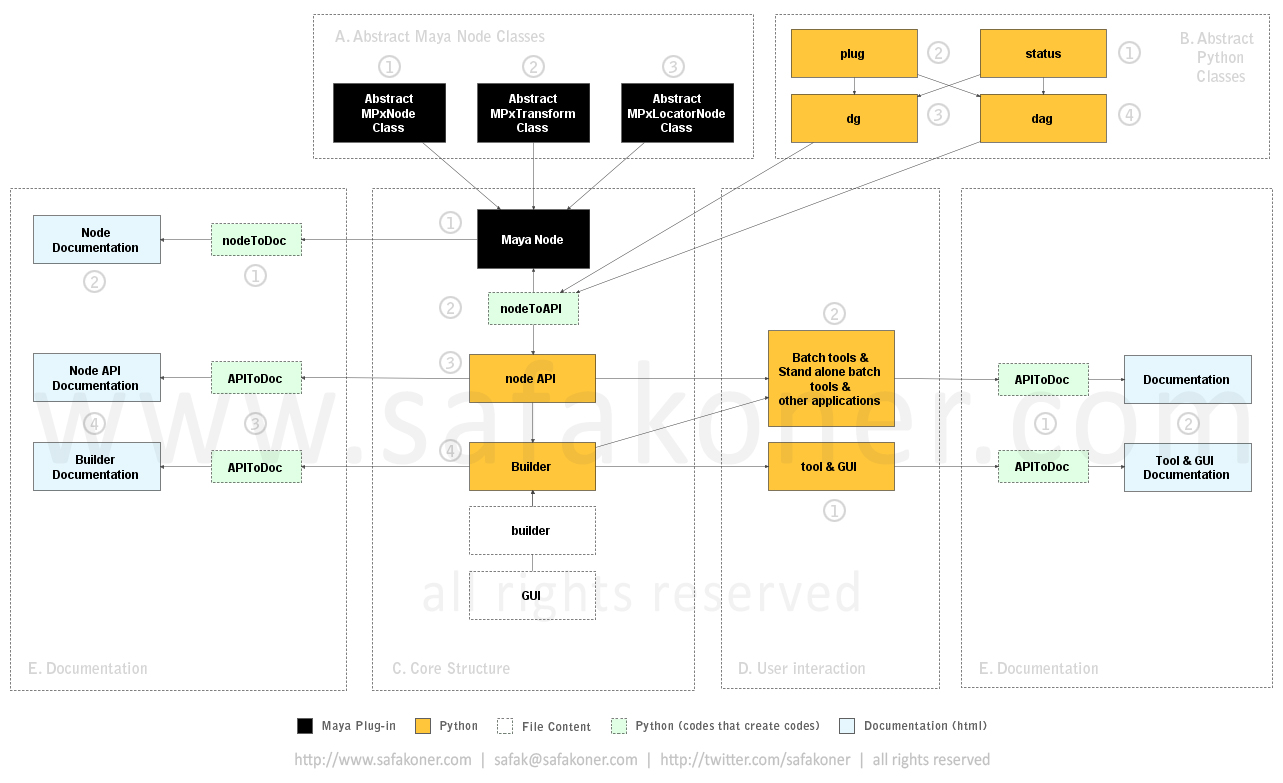
E. Documentation
On the Left Another important aspect of the pipeline is having a good documentation, so it can be learned, used and maintained in efficient and fast manner. In this step we are going to look at how the document files will be created.
“APIToDoc” class creates node documentation that contains node’s attributes and their properties. This is another code that writes codes, in this case it writes html files.
This document is in html format and can be viewed on any browser. It’s very important to have a help document in order to understand what the node offers.
“APIToDoc” class creates API documentation of the actual Python files. I do use docstring in consistent manner, so I can pull any information later on from those files. This class reads docstrings in the Python file and create a html file that you can see on any browser. As you may have guessed this is another code that writes codes.
Here you can see the html files have been created by the “APIToDoc” class automatically. Creating those file take lass then a second.
Conclusion
This is the end of first part and I have shown you the way to create an approach for pipeline development. Ways can be varying based on the needs. However, I have been using this approach, and I am very happy with it. It’s well organized and rock solid structure to use for any size of production.